

Don't you just love Riley's snazzy new bow tie? Well today I'm going to show you how you can make your very own.

All you need is one large strip of fabric. It should be twice as wide and twice as long as you want the finished bow to be. Mine measured about 4 in. wide X 10.5 in. long. You also need a little strip to go around the middle. Mine measured about 1.5 in. wide X 5 in. long. Depending on how you choose to attach your bow tie to the dog's collar, you may need another strip this size.
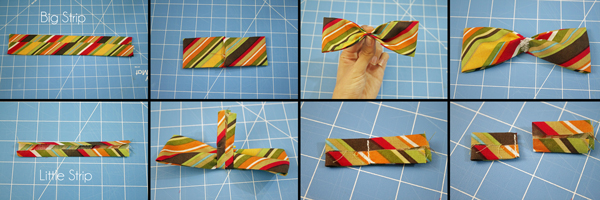
1. Fold the sides of your big strip in to the middle and press. 2. Fold the ends of the big strip in to the middle and press. 3. Pinch the middle of your bow into the classic bow tie shape. 4. Sew the middle down securely, either by hand or with a machine. 5. Fold the sides of your little strip into the middle and press. 6. Wrap your little strip around the middle of the bow tie inside out and pin at the back. 7. Slide the loop off of the bow and stitch on the outside of the pin. 8. Trim the excess fabric off.
You can now turn your middle loop right side out and slide back onto the middle of your bow. You should now have something that looks like this:

Now, you have a few choices of how to attach this to your dog's collar. You could always glue it to a collar, but it should probably be a spare one unless you really want your dog to wear this permanently. If your dog has a buckle collar, you can make a closed loop of fabric, or elastic to attach to your bow tie. If your dog wears a closed collar, like the Martingale style that my dog has, you will need a loop that has velcro or a button. I didn't have velcro on hand, so I used a button.

Here is my second loop of fabric with a very secure button and button hole. I sewed my button on with tough embroidery floss. I don't plan to leave my dog unattended while he wears this, but if you do, I recommend velcro.

Secure your collar loop to your bow tie by hand stitching through only the back layers of fabric. I also used embroidery floss for this step. (Note: The length of the fabric loop shown in this picture was actually too long. I highly recommend not being as lazy as I was and measuring around your dog's collar first. I cut it shorter and added a new button hole later.)

Try it out! Trust me, he knows he's handsome. This is only proving what he already knows.

This would be super cute on a female dog if you just turned the collar around and let her wear it on her neck in the back, or even on the side.
This is one dog accessory I can actually get into. It was quick and fun to make, and I can't wait for Riley to show it off when we visit relatives next week.


No comments:
Post a Comment